Signing Sequences Electronically
![]() Individual Steps of Electronic Signature
Individual Steps of Electronic Signature
The first step of electronic
signature is the Submit
process. (For general information about electronic signature, see Samples and Sequences
![]() Electronic Signature.) Click a Sequence that has not
yet been signed, and then select Submit
Results as described in
Electronic Signature.) Click a Sequence that has not
yet been signed, and then select Submit
Results as described in ![]() Signing
Sequences Electronically.
Signing
Sequences Electronically.
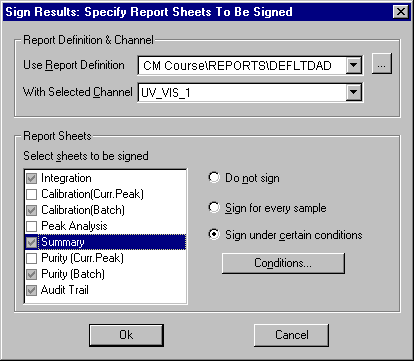
Select the Report Definition File (RDF) to be used for displaying the sequence, select the channel for which you want to show the results, and select the report sheets to be signed.
![]() Note:
Note:
If you want to submit a sequence using an RDF file that is outside the sequence ("external" RDF file), the CopyRDF privilege is needed.
If you want to submit a sequence using an external RDF file, but the sequence already contains an RDF file with the same name, the DeleteRDF privilege is needed.
![]() Tip:
Tip:
The settings saved in the Report Definition
File are used as defaults for the worksheets to be signed and for the
respective conditions. For more information, refer to How
to …: Preparing the Printout
![]() Specifying
the Pages to Be Printed.
Specifying
the Pages to Be Printed.
After you have selected the report definition file, the system writes the results to an SOR-File (Signed Off Results). You can monitor the procedure on the screen via a status bar that indicates the percentage of results already copied to the file. Simultaneously, the pages of the report for the individual samples are frozen. Afterward, the Check Signed Results dialog box appears:
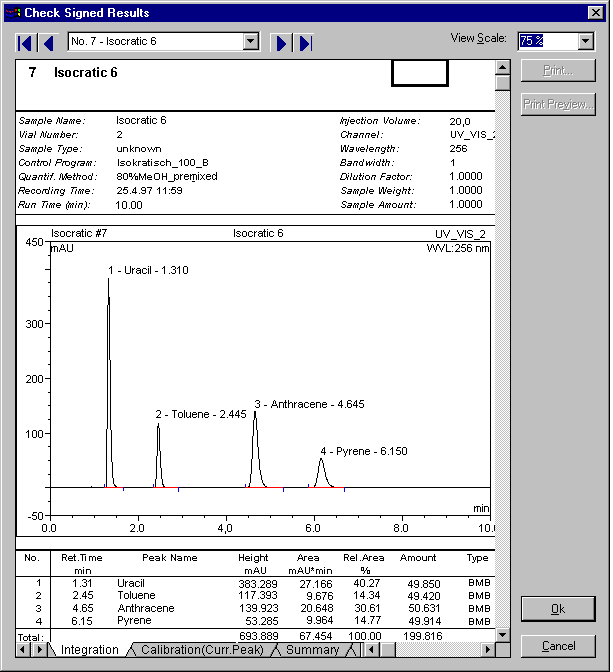
This dialog box allows you to check the report to be signed. Use the arrow keys to toggle between different sequence samples. For each sample, the tab pages for the selected report sheets are displayed. Click OK when you have finished checking the report. The Submit Signature dialog box appears. To sign the SOR file, enter your User ID and the signature password:
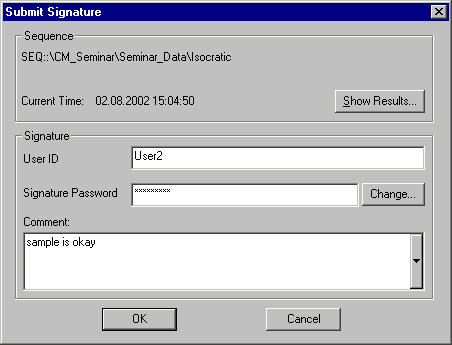
In the Comment field, you can enter additional information, such as any critical or doubtful points you noticed while creating the report.
When a sequence is open, the SOR file is displayed under the other sequence files in the top right Browser section. Double-click to open the SOR file:
![]()
To review sequences that have been signed and submitted, select Review Results. You can monitor the process on the screen. The files and samples of the sequence that have already been reviewed are listed, as well as the result of the review. For the file or sample under review, the status bar indicates the percentage of completion:
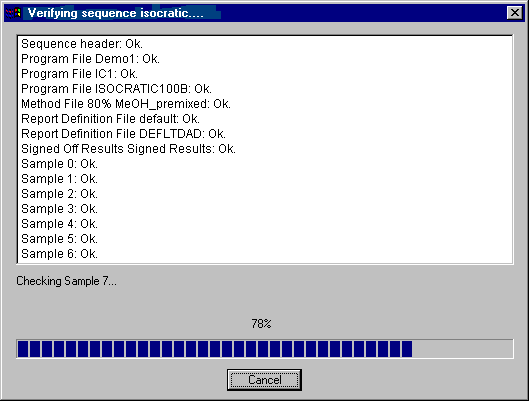
(Reviewing the results is much faster than submitting the signature. Thus, the above dialog box may be visible only for a few seconds, especially with short sequences.) To approve a sequence, proceed in the same way.